Table of Contents:
- Overview
- Dedication
- A Word of Warning!
- Section 1: Getting Comfortable with Kali Linux
- Section 2: Essential Tools in Kali
- Section 3: Passive Reconnaissance
- Section 4: Active Reconnaissance
- Section 5: Vulnerability Scanning
- Section 6: Buffer Overflows
- Section 7: Handling Public Exploits
- Section 8: Transferring Files to your target
- Section 9: Privilege Escalation
- Section 10: Client-Side Attacks
- Section 11: Web Application Attacks
- Section 12: Password Cracking
- Section 13: Port Redirection and Pivoting
- Section 14: Metasploit Framework
- Section 15: Antivirus Bypassing
- Extra Resources
- Setting up your Pentesting Environment
- Wargames/Hands-on Challenges
- Capture the Flag Competitions (CTFs)/Cyber Competitions
- Bug Bounty Programs
- Vulnerable Machines
- Tips to participate in the Proctored OSCP exam
- Other Resources
- Conclusion
Overview:
For the past 4 years of my life I had one goal: Pass OSCP on my first try. I started by reviewing the course syllabus and I realized there were some things that I did not know, which made me nervous to start the course. So, I went through a variety of resources until I thought I was ready to begin. This guide contains those resources and my advice to prepare for your adventure to take the PWK/OSCP!
For those of you that would like to know about my journey when I took the course and exam, you can find my earlier post here: https://www.netsecfocus.com/oscp/review/2019/01/29/An_Adventure_to_Try_Harder_Tjnulls_OSCP_Journey.html
Dedication:
A big shout out goes to abatchy! Without his guide I would have never started exploring for other resources. Thank you for creating your original guide: https://www.abatchy.com/2017/03/how-to-prepare-for-pwkoscp-noob
I also want to thank the following people for taking the time to read this guide:
- Rey Bango
- Tunny Traffic aka VCSEC. A moderator at Netsec Focus
- G0t Mi1k
- The team at Offensive Security
This guide has been approved by Offensive Security!
A Word of Warning!:
Do not expect these resources to be the main thing you use for obtaining OSCP. When you are ready to take the course, you should expect the following:
- Spending a lot of time researching.
- Do not expect the admins or even other students to give you answers easily.
- Plan to make a commitment to this and have an open mindset to learning new things.
- Know your tools! There are certain tools that you cannot use for the exam. However, that does not mean you should skip over them. Take some time to understand them because you may have to use them on an actual engagement or in the field.
- Remember Offensive Security motto: TRY HARDER
As of now Offensive Security has restricted the following tools:
- Commercial tools or services (Metasploit Pro, Burp Pro, etc.)
- Automatic exploitation tools (e.g. db_autopwn, browser_autopwn, SQLmap, SQLninja etc.)
- Mass vulnerability scanners (e.g. Nessus, NeXpose, OpenVAS, Canvas, Core Impact, SAINT, etc.)
- Features in other tools that utilize either forbidden or restricted exam limitations
Reference: https://support.offensive-security.com/oscp-exam-guide/
Most importantly: Have fun! You will learn a lot from this course, take your time to understand the material and this guide. Do not forget to take breaks and spend time away from the electronics. Trust me you do not want to burn yourself out.
Course Syllabus:
The 2nd most important resource that I used to help me prepare for the course: https://www.offensive-security.com/documentation/penetration-testing-with-kali.pdf
From the syllabus I will breakdown each section by providing you the resources I used to prepare for the course. Once I finish going through the syllabus, I will also be providing some extra resources that came in handy. You don’t need to use this guide in order; feel free to jump around as it suits you.
- Getting Comfortable with Kali Linux
- Essential Tools in Kali
- Passive Reconnaissance
- Active Reconnaissance
- Vulnerability Scanning
- Buffer Overflows
- Working with Public Exploits
- File Transfer
- Privilege Escalation
- Client-Side Attacks
- Web Application Attacks
- Password Attacks
- Tunneling/Pivoting
- Introduction to the Metasploit Framework
- Antivirus Bypassing
Section 1: Getting Comfortable with Kali Linux
Kali Linux Revealed and Online Course: A good foundational course that helped me understand more about Kali Linux and it has a nice Linux Fundamentals section as well.
- Book Link: https://kali.training/downloads/Kali-Linux-Revealed-1st-edition.pdf
- Online Course Link: https://kali.training/lessons/introduction/
Bash Scripting: The bash Guide: A good guide to get you into the bash scripting
Linux Journey: A huge guide to learn about a variety of different things in Linux. All the lessons are free.
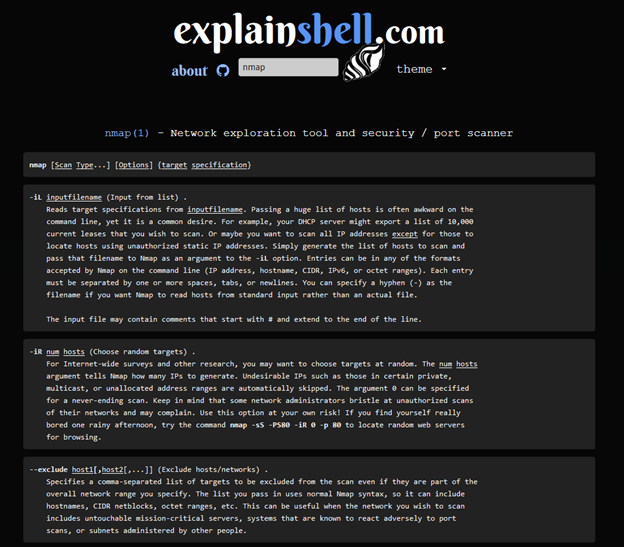
Explainshell: Awesome resource that parses a variety of man pages from Ubuntu Manage Repository. It breaks down the commands you are using, but it is best to refer to the man pages if you have any questions: .
Hands on challenge to get comfortable with Linux:
- Overthewire Bandit: https://overthewire.org/wargames/bandit/
- Cmdchallenge.com: https://cmdchallenge.com/
- HackerRank Linux Shell: https://www.hackerrank.com/domains/shell
Books:
- The Linux Command Line (2nd Edition is coming soon!): https://nostarch.com/tlcl2
- Linux for Hackers: https://nostarch.com/linuxbasicsforhackers
Section 2: Essential Tools in Kali
Netcat: The TCP/IP Swiss Army tool. Experiment with this tool and understand what it does because you will be using this almost every day during the time in your course.
- SANS Netcat Cheatsheet: https://www.sans.org/security-resources/sec560/netcat_cheat_sheet_v1.pdf
Ncat: A better version of netcat in my opinion. Supports SSL communication and it is part of Nmap.
TCPDump: Command line base Network Analysis Tool. Very useful and good to know if you are on a system that does not have a gui interface. Here is a good cheat sheet I used for tcpdump when I needed to troubleshoot my exploits: https://www.andreafortuna.org/technology/networking/tcpdump-a-simple-cheatsheet/
- Daniel Miessler TCPDump Guide: https://danielmiessler.com/study/tcpdump/
Wireshark: GUI based Network Analysis tool. There a lot of free PCAP’s samples online that you can use to understand how Wireshark works. Be careful with downloading some of these PCAP files because they may contain malware on them :D
PCAP Samples:
- Netresec: https://www.netresec.com/?page=pcapfiles
- Malware Traffic Analysis: https://www.malware-traffic-analysis.net/
- Packettotal (Just like virustotal but for PCAP Analysis): https://packettotal.com/
Section 3: Passive Reconnaissance
Take some time to learn about these tricks and techniques. They will certainly come in handy!
Google Dorks: Using various google searches that you can find that may expose sensitive information about a target.
- SANS Google Dork Cheatsheet: https://www.sans.org/security-resources/GoogleCheatSheet.pdf
- Google Hacking Database: https://www.exploit-db.com/google-hacking-database
- Netcraft: https://netcraft.com/
Email Harvesting:
- theharvester: https://github.com/laramies/theharvester
- recon-ng: https://bitbucket.org/LaNMaSteR53/recon-ng/overview
Additional Resources: Tools I did not use in the lab but I used them for preparation and they have come in handy for other tests.
- Domaintools: http://whois.domaintools.com/
- MX Toolbox: https://mxtoolbox.com/DNSLookup.aspx
Section 4: Active Reconnaissance
Introduction to DNS: If you do not know what DNS is or how it works, here is a great guide that I used to better understand it from Digital Ocean: https://www.digitalocean.com/community/tutorials/an-introduction-to-dns-terminology-components-and-concepts
If you think you have a good understanding of what DNS is then you will also need to understand how to perform forward and reverse lookups. In addition, you should also know how zone transfers work and how to perform them. Performing these tests will certainly help you better understand what your targets are in the lab. For more information about these techniques check out this article here: https://resources.infosecinstitute.com/dns-enumeration-techniques-in-linux/#gref
Tools for DNS Enumeration:
- Dnsrecon Created by Darkoperator: https://github.com/darkoperator/dnsrecon
Network Scanning:
Nmap: A tool that you should 100% totally learn about. You will probably use this everyday (If not most of the time while you are in the lab). I highly recommend you take some time to learn what the tool does, how each command switch works, each scanning technique you can run, and any other capabilities. Nmap is a powerful tool that has the ability to determine what hosts are online, what services they are running, what operating system is running on that host, and dozens of characteristics. In addition, one of the most powerful features that you should also learn is the Nmap Scripting Engine (NSE). With NSE scripts you have the ability automate a wide variety of networking tasks for your scans including vulnerability detection and exploitation. Here are my resources that I used to learn more about Nmap:
- Nmap Official Guide: I used this more than the man pages. I highly recommend purchasing the full book since the official guide is missing a few chapters, such as “Detecting and Subverting Firewalls and Intrusion Detection Systems”, “Optimizing Nmap Performance”, “Port Scanning Techniques and Algorithms”, “Host Discovery (Ping Scanning)”, and more. https://nmap.org/book/toc.html
- Link for Nmap Network Scanning Book (if you want to purchase it): https://www.amazon.com/Nmap-Network-Scanning-Official-Discovery/dp/0979958717
- SANS Nmap Cheatsheet: https://blogs.sans.org/pen-testing/files/2013/10/NmapCheatSheetv1.1.pdf
- Nmap Scripting Engine (NSE): https://nmap.org/book/man-nse.html
- ZephrFish Nmap Blog: https://blog.zsec.uk/nmap-rtfm/
Service Enumeration:
There are a variety of services running on so many systems…take the time to understand them! Do not just scan them and move on. Take some time to look at each of them because they could be a key for you to obtain shell access on a system!
Abatchy provided a link from 0day security that gave me a lot of ideas and things to look for that I may have missed when I skipped some the of the services in the lab. You can find that resource here: http://0daysecurity.com/penetration-testing/enumeration.html
Highoncoffee Penetration Testing Cheatsheet: https://highon.coffee/blog/penetration-testing-tools-cheat-sheet/
Section 5: Vulnerability Scanning
I did not spend too much time in this section for preparation because vulnerability scanners are simple and easy to configure. In addition, the purpose of a vulnerability scanner is to identify security holes in services or in a operating system. These scanners rely on a database that contains the necessary information needed to conduct a scan. A word of caution! Be careful when you use vulnerability scanners on your targets because there is a chance that some of the plugins or features can cause an impact to your target such as taking down that service, locking out user accounts, and even crash the system. In the syllabus the tool recommends that you use OpenVAS since it is a full-featured vulnerability scanner. However, there are other vulnerability scanners out there and I highly recommend playing with Nessus: https://www.tenable.com/products/nessus/nessus-professional
The reason why I am stating that you should use Nessus is because it is more stable on Kali Linux and it has simple straightforward interface. I also was able to use the Nessus Home key for most of my testing and to help me get more familiar with how these vulnerability scanners work. Nessus is a real popular tool for vulnerability scanning in the infosec world and I certainly encourage you to play with it!
For instructions on how to install Nessus on Kali Linux you can find it here: https://www.tenable.com/blog/getting-started-with-nessus-on-kali-linux
For obtaining a Nessus key you can grab one here: https://www.tenable.com/products/nessus-home
Section 6: Buffer Overflows
My favorite section to learn about! The material provided in the PWK was fantastic and really straightforward. Throughout the internet you will probably find a variety of different resources to help you understand how buffer overflows work. With that being said I will provide some of my notes and resources that helped me understand how buffer overflows.
Corelan Team: A huge shout out to these guys because their articles from information security to exploit development are absolutely incredible! They have an article they posted about Stack Based Overflows that gave me a better understanding of identifying a buffer overflow in an application:
- Part 1: https://www.corelan.be/index.php/2009/07/19/exploit-writing-tutorial-part-1-stack-based-overflows/
- Part 2: https://www.corelan.be/index.php/2009/07/23/writing-buffer-overflow-exploits-a-quick-and-basic-tutorial-part-2/
Once I finished reading the articles I decided to start going through write-ups and forums where people manually identified buffer overflows in certain applications. With these walkthroughs I used Exploit-DB to check if they had the vulnerable application in many cases. I won’t provide any of these walkthroughs but I will at least provide the binaries that you can use to manually identify buffer overflows.
- Windows Binaries (Recommend that you run these on Windows 7/XP 32 bit):
- Vulnserver: https://samsclass.info/127/proj/vuln-server.htm
- Minishare 1.4.1: https://www.exploit-db.com/exploits/636
- Savant Web Server 3.1: https://www.exploit-db.com/exploits/10434
- Freefloat FTP Server 1.0: https://www.exploit-db.com/exploits/40673
- Core FTP Server 1.2: https://www.exploit-db.com/exploits/39480
Linux Binaries:
- Linux Buffer Overflow: https://samsclass.info/127/proj/lbuf1.htm
Vulnerable Boxes:
- Brainpan 1: https://www.vulnhub.com/entry/brainpan-1,51/
- Pinky’s Palace version 1: https://www.vulnhub.com/entry/pinkys-palace-v1,225/
Other Resources:
- Whitepaper Introduction to Immunity Debugger: https://www.sans.org/reading-room/whitepapers/malicious/basic-reverse-engineering-immunity-debugger-36982
- Buffer Overflows for Dummies: https://www.sans.org/reading-room/whitepapers/threats/buffer-overflows-dummies-481
- Vortex Stack Buffer Overflow Practice: https://www.vortex.id.au/2017/05/pwkoscp-stack-buffer-overflow-practice/
- Smashing the Stack For Fun and Profit: http://www-inst.eecs.berkeley.edu/~cs161/fa08/papers/stack_smashing.pdf
Section 7: Handling Public Exploits
There will come a time that you will need to use a public exploit on your target to see if you can obtain a shell on it. With that exploit you may need to modify shellcode or even parts of the exploit to match with your system to obtain a connection from your target. A word of advice:
Before you download a public exploit I would consider you take some time to review the code and understand what the exploit is suppose to actually too. If you do not understand how the code works…do some research!!! I am absolutely positive you can find proof of concepts online and walkthroughs that will explain how the exploit actually works. Not all exploits are going to work right out of the box you will need to configure them to make sure they can reach back to your attacking system. If you do not review the exploit code or make any modifications, then you are running risk that the exploit will fail, crash your target system/service, or it may allow other users to connect into the system.
Places to find exploits:
Tools for finding exploits:
- Searchsploit: a command line search tool for Exploit-DB that has a repo of Exploit Database with you.
Command Examples:
searchsploit MS-17-010: finds all cases/exploits linked to MS17-010
root@kali:~# searchsploit ms17-010
--------------------------------------------------------------------------------------------------- ----------------------------------------
 Exploit Title                                                                                     |  Path
                                                                                                   | (/usr/share/exploitdb/)
--------------------------------------------------------------------------------------------------- ----------------------------------------
Microsoft Windows - 'EternalRomance'/'EternalSynergy'/'EternalChampion' SMB Remote Code Execution  | exploits/windows/remote/43970.rb
Microsoft Windows - SMB Remote Code Execution Scanner (MS17-010) (Metasploit)                      | exploits/windows/dos/41891.rb
Microsoft Windows Server 2008 R2 (x64) - 'SrvOs2FeaToNt' SMB Remote Code Execution (MS17-010)      | exploits/windows_x86-64/remote/41987.py
Microsoft Windows Windows 7/2008 R2 - 'EternalBlue' SMB Remote Code Execution (MS17-010)           | exploits/windows/remote/42031.py
Microsoft Windows Windows 7/8.1/2008 R2/2012 R2/2016 R2 - 'EternalBlue' SMB Remote Code Execution  | exploits/windows/remote/42315.py
Microsoft Windows Windows 8/8.1/2012 R2 (x64) - 'EternalBlue' SMB Remote Code Execution (MS17-010) | exploits/windows_x86-64/remote/42030.py
--------------------------------------------------------------------------------------------------- ----------------------------------------

Shellcodes: No Result
searchsploit -x /usr/share/exploitdb/exploits/windows/remote/43970.rb: The -x command switch allows you to examine the exploit code or information about the exploit. You can also upload nmap xml files to Searchsploit so it can find available exploits that match your target.
root@kali:~# searchsploit -x /usr/share/exploitdb/exploits/windows/remote/43970.rb

Snippet of the exploit:
##
# This module requires Metasploit: https://metasploit.com/download
# Current source: https://github.com/rapid7/metasploit-framework
##

# Windows XP systems that are not part of a domain default to treating all
# network logons as if they were Guest. This prevents SMB relay attacks from
# gaining administrative access to these systems. This setting can be found
# under:
#
#  Local Security Settings >
#   Local Policies >
#    Security Options >
#     Network Access: Sharing and security model for local accounts

class MetasploitModule < Msf::Exploit::Remote
  Rank = NormalRanking

  include Msf::Exploit::Remote::SMB::Client::Psexec_MS17_010
  include Msf::Exploit::Powershell
  include Msf::Exploit::EXE
  include Msf::Exploit::WbemExec
  include Msf::Auxiliary::Report

  def initialize(info = {})
    super(update_info(info,
      'Name'           => 'MS17-010 EternalRomance/EternalSynergy/EternalChampion SMB Remote Windows Code Execution',
      'Description'    => %q{
        This module will exploit SMB with vulnerabilities in MS17-010 to achieve a write-what-where
        primitive. This will then be used to overwrite the connection session information with as an
        Administrator session. From there, the normal psexec payload code execution is done.

        Exploits a type confusion between Transaction and WriteAndX requests and a race condition in
        Transaction requests, as seen in the EternalRomance, EternalChampion, and EternalSynergy
        exploits. This exploit chain is more reliable than the EternalBlue exploit, but requires a
        named pipe.
Play with some of the other command switches that Searchsploit has because it will make it much easier for you to find exploits on your kali box.
Section 8: Transferring Files to your target:
Depending on the target system you obtain access too you may not have the ability to transfer exploits or other tools you need to that system. With this being said you will need to figure out some techniques to transfer files to and from your target system. Here are a few guides I used to get a better understanding of how to transfer files onto Windows and Linux systems:
-
Awakened: Transfer files from Kali to the target machine https://awakened1712.github.io/oscp/oscp-transfer-files/
-
Ropnop Transferring Files from Linux to Windows (post-exploitation): https://blog.ropnop.com/transferring-files-from-kali-to-windows/
One tool that I also found interesting to transfer files on windows systems is using bitsadmin. The tool is a command-line tool that you can use to create download or upload jobs and monitor their progress. You can find examples on how to use the tool here: https://docs.microsoft.com/en-us/windows-server/administration/windows-commands/bitsadmin-examples
Another tool you can check out is Impacket. This tool contains a variety of programming classes that you can use to interact with target networks to parse raw data or you can be able to use their scripts to transfer files to or from your target host.
Also check out python modules like these:
Python -m SimpleHTTPServer 80: Spins up a webserver in the directory you are located on port 80.Python3 -m http.server 80: Spins up a python version 3.X web server in the directory you are located on port 80.Python -m pyftpdlib -p 21 -w: spins up a FTP server in the directory you are located on port 21 and it allows anonymous login access.Python3 -m pyftpdlib -p 21 -w: spins up a Python 3.X FTP server in the directory you are located on port 21 and it allows anonymous login access.
Section 9: Privilege Escalation
In this section you will find a lot of techniques that range from getting administrative access from a kernel exploit or through a misconfigured service. The possibilities are endless, and make sure you find the ones that will work for you. In order to get an understanding of this section I recommend applying your knowledge through Vulnhub or Hackthebox to improve your skills in this area. I know there are scripts for automating this process but at some points those scripts can miss something very important on your target that you need to escalate your privileges. Something you should keep in mind :D.
For this section I am going to break into two parts: Windows and Linux Privilege Escalation Techniques.
Windows Privilege Escalation Guides:
-
Fuzzysecurity Windows Privilege Escalation Fundamentals: Shout out to fuzzysec for taking the time to write this because this is an amazing guide that will help you understand Privilege escalation techniques in Windows. http://www.fuzzysecurity.com/tutorials/16.html
-
Pwnwiki Windows Privilege Escalation Commands: http://pwnwiki.io/#!privesc/windows/index.md
-
Absolomb’s Security Blog: Windows Privilege Escalation Guide https://www.absolomb.com/2018-01-26-Windows-Privilege-Escalation-Guide/
-
Pentest.blog: Windows Privilege Escalation Methods for Pentesters https://pentest.blog/windows-privilege-escalation-methods-for-pentesters/
Windows Privilege Escalation Tools:
-
JAWS (Created by 411Hall): A cool windows enumeration script written in PowerShell. https://github.com/411Hall/JAWS/commits?author=411Hall
-
Windows Exploit Suggester (Created by GDSSecurity): A python script that compares target patch against Microsoft vulnerability database to detect any missing patches on the target. https://github.com/GDSSecurity/Windows-Exploit-Suggester
-
Windows Exploit Suggester Next Generation: https://github.com/bitsadmin/wesng
-
Sherlock (Created by RastaMouse): Another cool PowerShell script that finds missing software patches for local privilege escalation techniques in Windows. https://github.com/rasta-mouse/Sherlock
-
Other Resources for Windows Privilege Escalation Techniques: https://medium.com/@rahmatnurfauzi/windows-privilege-escalation-scripts-techniques-30fa37bd194
Linux Privilege Escalation Guides: The only guide I probably ever used to help me understand privilege escalation techniques in Linux systems was from g0tmi1k post. This blog is a must that everyone should have for preparing for the OSCP in my opinion. You can find his guide here: https://blog.g0tmi1k.com/2011/08/basic-linux-privilege-escalation/
GTFOBins (I have to thank Ippsec for sharing this with me): Contains a curated list of Unix binaries that that have the ability to be exploited by an attacker to bypass local security restrictions on a Linux system. https://gtfobins.github.io/
Linux Privilege Escalation Tools:
LinEnum: A great Linux privilege escalation checker that is still maintained by the guys at rebootuser.com. You can find there tool here: https://github.com/rebootuser/LinEnum
- Linux Exploit Suggester 2: https://github.com/jondonas/linux-exploit-suggester-2
One thing that I will mention is if you want to practice your Linux privilege escalation, I highly recommend you take a look at Lin.Security vulnerable box created by in.security! The box was designed to help people understand how certain applications and service that are misconfigured can be easily abused by an attacker. This box really helped me improved my privilege escalation skills and techniques on Linux systems.
- Main Link: https://in.security/lin-security-practise-your-linux-privilege-escalation-foo/
- Backup: https://www.vulnhub.com/entry/linsecurity-1,244/
Section 10: Client-Side Attacks
Running Client-Side Attacks usually require client interaction so it’s good to have an understanding of how this works and also how you can set one up. For instance, check out the Client Side Attack Section in Metasploit Unleashed: https://www.offensive-security.com/metasploit-unleashed/client-side-attacks/
Section 11: Web Application Attacks
This section is the one I spent most of time preparing for PWK and OSCP. In this section you need to understand the following web attacks:
-
cross-site scripting (XSS): OWASP:https://www.owasp.org/index.php/Cross-site_Scripting_(XSS)
-
SQL Injections: OWASP: https://www.owasp.org/index.php/SQL_Injection
-
Pentest Monkey SQL Cheat Sheets: http://pentestmonkey.net/category/cheat-sheet/sql-injection
-
File Inclusion Vulnerabilities. https://www.offensive-security.com/metasploit-unleashed/file-inclusion-vulnerabilities/
Tools for finding Web Vulnerabilities and conducting Web Attacks:
Burp Suite:
A popular web application vulnerability scanner that contains a variety of features and plugins to identify web vulnerabilities on certain web applications. The tool uses an interception proxy that connects to your browser to route traffic through the Burp Suite proxy client. Once the interception proxy is configured you can start capturing and analyzing each request to and from the target web application. With these’s captured requests a penetration tester can analyze, manipulate, and fuzz individual HTTP requests in order to identify potential parameters or injection points manually.
Bugcrowd University has a webinar that Jason Haddix created explaining about burp suite and how you can use it. You can find this recording here: https://www.bugcrowd.com/resource/introduction-to-burp-suite/
SQL Injection Tools: I would not recommend using these tools until you have a clear understaning about SQL Databases and how a SQL Injection works. These tools below make it easy to automate the process for conducting a SQL Injection but it is possible that they can causes issues to a targets SQL Database. Here are a list of tools that I have played with to get a better understanding of how you can automate SQL Injections:
- SQLmap: https://github.com/sqlmapproject/sqlmap/wiki/Usag
- NoSQLMap: https://github.com/codingo/NoSQLMap
- SQLNinja: http://sqlninja.sourceforge.net/
Nikto (Created by Chris Sullo): A web server scanner which performs comprehensive tests against web servers for multiple items. This tool can be able to scan for vulnerbalilities on the web application, checks for server configuration that include multiple index files, HTTP server options, and will attempt to identify installed the version of the web server, and any plugins/software that is running on it. Please keep this in mind that this tool is can be very noisy when scanning a targets web server.
Link: https://cirt.net/Nikto2
- Web Directory Scanners:
These tools are designed to brute force site structure including directories and files in websites. These tools can be able to identify hidden directory scrtuctures or webpages that can come in handy when you are in the labs or during your assessment.
- Dirsearch: https://github.com/maurosoria/dirsearch
- Dirbuster: https://tools.kali.org/web-applications/dirbuster
- Gobuster: https://github.com/OJ/gobuster
- Wfuzz: https://github.com/xmendez/wfuzz
Hands on areas to improve your web attack skills:
- Metasploitable 2: Contains Vulnerable Web Services such as Multidae and the Damn Vulnerable Web App (DVWA) that you can use to improve your web skills.
Link to download the machine: https://metasploit.help.rapid7.com/docs/metasploitable-2
Backup Link: https://www.vulnhub.com/entry/metasploitable-2,29/
-
Exploitability Guide: https://metasploit.help.rapid7.com/docs/metasploitable-2-exploitability-guide
-
OWASP Juice Shop: Another vulnerable web application that contains a variety of challenges to improve your web skills. https://www.owasp.org/index.php/OWASP_Juice_Shop_Project
-
Overthewire Natas: A set of wargame challenges that are web base that you will need to complete in order to move to the next round. I really enjoyed their challenges when I did them! http://overthewire.org/wargames/natas/
-
Other resources: Hack This Site: https://www.hackthissite.org/
Section 12: Password Cracking
In this section you need to understand the basics of password attacks. Identify the differences between Windows (NTLM) hashes and Linux hashes. In addition, you will also need to understand the different tools that you can use to conduct online and offline password attacks. Here is a list of resources that I have used that helped me better understand how password cracking works:
Introduction to Password Cracking: https://alexandreborgesbrazil.files.wordpress.com/2013/08/introduction_to_password_cracking_part_1.pdf
Offline Tools for Password Cracking:
-
Hashcat: https://hashcat.net/hashcat/ Sample Hashes to test with Hashcat: https://hashcat.net/wiki/doku.php?id=example_hashes
- John the Ripper: https://www.openwall.com/john/
- Metasploit Unleashed using John the Ripper with Hashdump: https://www.offensive-security.com/metasploit-unleashed/john-ripper/
Online Tools for Password Cracking:
- THC Hydra: https://github.com/vanhauser-thc/thc-hydra
- Medusa: http://h.foofus.net/?page_id=51
Wordlist generators:
Wordlists:
- In Kali: /usr/share/wordlists
- Seclists: apt-get install seclists You can find all of his password lists here: https://github.com/danielmiessler/SecLists/tree/master/Passwords
Online Password Crackers:
I usually went for these first to see if they had the hash cracked in their database. However, don’t use these online crackers as your main tools for everything. Uploading a hash from an engagement can be a huge risk so make sure you use your offline tools to crack those types of hashes. Here is a list of online hash crackers that I found online that you can use to crack hashes:
- https://hashkiller.io
- https://www.cmd5.org/
- https://www.onlinehashcrack.com/
- https://gpuhash.me/
- https://crackstation.net/
- https://crack.sh/
- https://passwordrecovery.io/
- http://cracker.offensive-security.com/
Other Resources for Password Cracking:
- Pwning Wordpress Passwords: https://medium.com/bugbountywriteup/pwning-wordpress-passwords-2caf12216956
Section 13: Port Redirection and Pivoting
Depending on your scope, some of the machines may not be directly accessible. There are systems out there that are dual homed, which allow you to connect into an internal network. You will need to know some of these techniques in order to obtain access into there non-public networks:
- Abatchy’s Port Forwarding Guide: https://www.abatchy.com/2017/01/port-forwarding-practical-hands-on-guide
- Windows Port Forwarding: http://woshub.com/port-forwarding-in-windows/
- SSH Tunneling Explained: https://chamibuddhika.wordpress.com/2012/03/21/ssh-tunnelling-explained/
- Understanding Proxy Tunnels: https://www.offensive-security.com/metasploit-unleashed/proxytunnels/
- Understanding Port forwarding with Metasploit: https://www.offensive-security.com/metasploit-unleashed/portfwd/
- Explore Hidden Networks with Double Pivoting: https://pentest.blog/explore-hidden-networks-with-double-pivoting/
- 0xdf hacks stuff. Pivoting and Tunneling: https://0xdf.gitlab.io/2019/01/28/pwk-notes-tunneling-update1.html
Tools to help you with Port Forwarding and Pivoting:
- Proxychains: https://github.com/haad/proxychains
- Proxychains-ng: https://github.com/rofl0r/proxychains-ng
- SSHuttle (Totally Recommend learning this): https://github.com/sshuttle/sshuttle
- SSHuttle Documentation: https://sshuttle.readthedocs.io/en/stable/
Vulnerable systems to practice pivoting:
- Wintermute: https://www.vulnhub.com/entry/wintermute-1,239/
Section 14: Metasploit Framework
The only guide that I used to learn more about Metasploit is Offensive Security Metasploit Unleashed course…which is free! https://www.offensive-security.com/metasploit-unleashed/
Other Resources: Metasploit The Penetration Tester’s Guide (A super awesome book to read): https://nostarch.com/metasploit
Msfvenom Cheat Sheets:
Section 15: Antivirus Bypassing
I did not spend too much time learning about this section since Metasploit encodes it payloads to bypass most anti-virus (well older versions at least). The course is pretty straight forward in this section.
Tools to play with Anti-Virus evasion: Veil-Framework: https://github.com/Veil-Framework/Veil
Extra Resources
This concludes the resources I have used that helped me understand the course syllabus. Now I will share with you some tips and extra resources that I used during my preparation for the PWK/OSCP.
Setting up your Pentesting Environment:
The course recommends that you are using VMware products to run the custom Kali Linux image that they have created. Windows users can purchase VMware Workstation or use their free program VMware Player. As for MAC Users you will need to use VMware Fusion. If you would like to download the custom Kali Linux System for the PWK you can find it here:
https://images.offensive-security.com/pwk-kali-vm.7z
Keep in mind that Offensive Security does update their images from time to time. Personally, I only used their image for completing the lab exercises and I had a separate Kali Linux image that I customized to use for the labs and exam.
Another virtual machine I created was a Windows 7 32-bit system to spin up any vulnerable applications I needed to debug or to check if I could obtain a shell from them. You could also create a Windows 7 64-bit system as well but some of 32-bit applications may not work properly as they would on an actual 32-bit system. This practice is great to implement in case you are stuck on a windows system that is running a service that for some reason you cannot obtain a shell on.
Wargames/Hands-on Challenges:
I know I stated theses before but I am going to reiterate this:
OverTheWire Bandit: A good set of fun Linux challenges to get yourself familiarizes with bash and Linux. Abatchys walkthrough really helped me here:
- Bandit 1-5: https://www.abatchy.com/2016/10/overthewire-bandit-0-5
- Bandit 6-10: https://www.abatchy.com/2016/10/overthewire-bandit-6-10
- Bandit 11-15: https://www.abatchy.com/2016/10/overthewire-bandit-11-15
- Bandit 16-20: https://www.abatchy.com/2016/10/overthewire-bandit-16-20
- Bandit 21-26: https://www.abatchy.com/2016/10/overthewire-bandit-21-24
OverTheWire Natas: A good set of simple web application challenges. These challenges will help you understand the basics you need to identify issues in web applications. Check out this walkthrough here: https://infamoussyn.wordpress.com/2014/02/05/overthewire-natas-level-0-16-writeup-updated/
UndertheWire: Probably my favorite place for challenges because they contain a huge set of PowerShell challenges. You can find their challenges here: http://www.underthewire.tech/wargames.htm
Root-me.org: A huge place that has challenges for almost everything in cybersecurity. For instance, you will see challenges in the following areas:
- Network Forensics (Packet Analysis, Captured Traffic, Network Services)
- Programming (C, PHP, Java, Shell-coding)
- Reverse Engineering (disassemble applications)
- Web Applications and Client Challenges.
- Forensic Challenges.
Spend a few minutes going through some of these!
SANS Holiday Hack Challenges: https://www.holidayhackchallenge.com/past-challenges/
Capture the Flag Competitions (CTFs)/Cyber Competitions:
I know some of you are reading this are probably skeptical on why I added this…well to be honest the cybersecurity careers that we are in are not a normal 7am-3pm job…it is a lifestyle. I understand for many of us that it is hard to set some time to do all of the things in this field and that is totally OK! If you have the time or if you already can, set some time out of your busy schedule to do a CTF. Go ahead and hack all of the things that many of these CTFs provide as challenges. Trust me you will learn some cool things in a CTF that not even a class may be able to teach you. Personally, competing in CTFs did help me in this course and also it gave me a better understanding of what things I should be looking for instead of jumping into rabbit holes!
Also do not be scared to compete in a CTF if it is your first time! Everyone has to start somewhere in their journey you just have to keep pushing forward. So, go out there and find some CTFs whether they are local to you or online make some time and have confidence in doing them.
If you cannot find any local CTFs check out CTFTime for online competitions that you can participate in. A lot of the cyber competitions in the past few years really helped me build my skills and I still go out once in awhile to find a CTF to compete in for fun 😊.
Bug Bounty Programs:
A great place to practice your skills and to make some possible profit as well! There are many bug bounty programs like Bugcrowd and Hackerone that you can participate for free. If you have never participated in bug bounty before check out Bugcrowd University as they provide a vast amount of material and resources to help you get started: https://www.bugcrowd.com/university/
Vulnerable Machines:
Boot-to-Root Vulnerable Machines! These machines are excellent to help you build your skills for pentesting. There are places where you can download them and run them on your system to begin practice or places where you can connect to their range and start hacking into the targets they have. Most of them result in obtaining root or Administrative/System level access in the end. Personally, my two favorite places are Hackthebox and Vulnhub.
Hackthebox:
An online penetration testing platform that contains a variety of machines to help you improve your penetration testing skills. For those who have not gone through the registration you will need to pass a challenge to generate yourself an activation code. Once you have generated your activation code, then you will have the ability to access their range. In the free tier you are allowed to play with the 20 active machines they have and they cycle a new system in the range every week and retire an old one there as well. If you want to access to their retired machines you will have to get VIP access. It is a very affordable in my opinion, and worth it to invest in. If you do not have the funds to invest into Hackthebox, do not worry because you can certainly find these walkthroughs online (once the boxes are retired). One place I would definitely recommend to look at is IppSec Hackthebox Walkthroughs on YouTube! I love watching his videos because he goes through step by step on how to obtain access onto the target and how to escalate your privileges to obtain root access. Each box has a different scenario and IppSec always has something extra to throw in when he is doing his walkthroughs.
With that being said I created a list of all of boxes that I did in Hackthebox that I thought were OSCP Like. You can find them here and also check out IppSec playlist he created from the list I recommended to start watching!
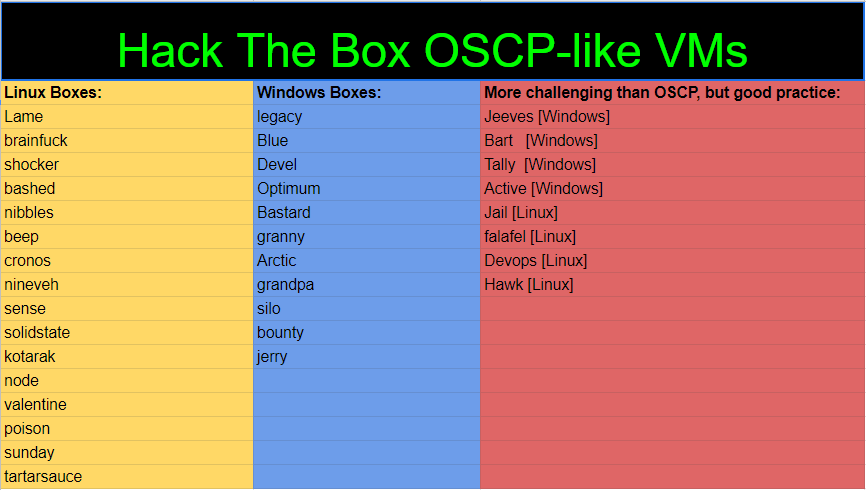
I will continue to be updating this list in the future, and if you would like to keep it around you can find it here and on NetSecFocus: https://docs.google.com/spreadsheets/d/1dwSMIAPIam0PuRBkCiDI88pU3yzrqqHkDtBngUHNCw8/edit#gid=1839402159
HTB Boxes to Prepare for OSCP (Youtube Playlist): https://www.youtube.com/playlist?list=PLidcsTyj9JXK-fnabFLVEvHinQ14Jy5tf
I want to give a huge thanks to ch4p and g0blin for starting Hackthebox! I am glad that I got to talk to you guys and I am grateful that we were able to help you guys out. I look forward to seeing you guys grow and will soon submit a box for you guys in the future!
Vulnhub:
Just like Hackthebox, except you have to download the vulnerable machines and run them on your local system. You will need VMware or VirtualBox (I recommend VMware workstation) to run these vulnerable systems. Please make sure that you are running these vulnerable systems on an isolated network and not on a public network.
Thanks to g0tmi1k and his team for hosting this site and to the creators who submit these vulnerable machines. I have also created a list of vulnhub machines that I have found to be OSCP-Like as well. You can find them here and on NetSecFocus:
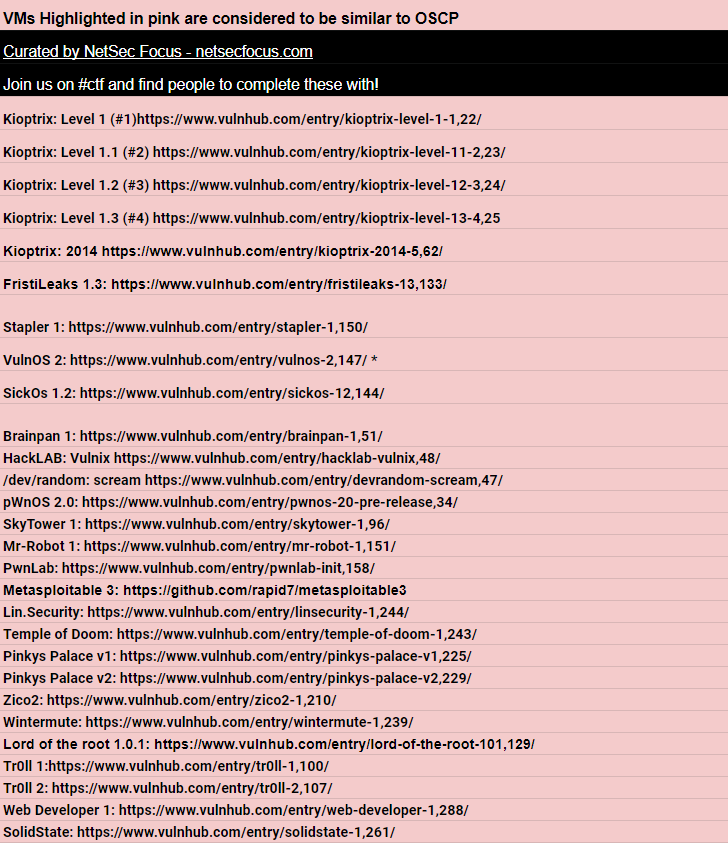
I will continue to update this list and if you would like a copy for review you can certainly find it here: https://docs.google.com/spreadsheets/d/1dwSMIAPIam0PuRBkCiDI88pU3yzrqqHkDtBngUHNCw8/edit#gid=0
Rooting Vulnerable Machines is extremely important when you are preparing for PWK/OSCP because you can’t depend on theoretical knowledge to pass. Improving your hands-on skills will play a huge key role when you are tackling these machines.
Tips to participate in the Proctored OSCP exam:
As of August 15th, 2018, all OSCP exams have a proctored exam. This means that a student will be monitored by an Offensive Security staff member through a screen sharing and webcam service. If you would like to learn more about this new proctoring process you can find it here: https://www.offensive-security.com/offsec/proctoring/ Before I took my exam, I had to go through a variety of things to make sure I was prepared to take my 1st attempt. Even with my preparation, I lost 30 mins of my actual exam time due to troubleshooting the applications for the proctor on my end. With that being said, here are my tips to help you guys prepare for the proctoring section when you are ready to take the exam:
- Make sure your system is able to meet the software/hardware requirements that offensive security provides in order to run these services. You can find that information here: https://support.offensive-security.com/proctoring-faq/
- Test your webcam to make sure it works. If you do not have a webcam for your system you can also use a spare laptop that has a webcam and connect the webcam session onto that system.
- The ScreenConnect application needs to be running on your main system that you will be using to connect to your exam.
- You can use multiple monitors for the exam. Keep in mind that the proctor must be able to see them and that they are connected to your system. The proctor will notify you about how many screens they see and you will need to confirm them with the number monitors you are using. If you use a system that has a monitor and it is not connected to the ScreenConnect application, then you will not be able to use that monitor for the exam.
- Be prepared and log into your webcam and screenconnect sessions 30 mins before your exam.
- Proctors cannot provide any assistance during the exam.
- You can take breaks, a nap, or grab a cup of coffee during your exam. Just make sure you notify the proctor when you leave and when you return for your exam.
- Also be dressed for your exam. I think that is pretty simple to understand why.
For any other questions you may have you can check out Offensive Security FAQ for Proctored Exams here: https://www.offensive-security.com/faq/
Other Resources:
NetSecFocus Learning Resources:
Books:
- Kali Linux Revealed: https://www.kali.org/download-kali-linux-revealed-book/
- Attacking Network Protocols: https://nostarch.com/networkprotocols
- Red Team Field Manual: https://www.amazon.com/Rtfm-Red-Team-Field-Manual/dp/1494295504
- Hash-Crack-Password-Cracking-Manual v3: https://www.amazon.com/Hash-Crack-Password-Cracking-Manual/dp/1793458618
- The Hacker Playbook Series: https://securepla.net/hacker-playbook/
- The Web Application Hacker Handbook: http://mdsec.net/wahh/
- Violent Python: https://www.amazon.com/Violent-Python-Cookbook-Penetration-Engineers/dp/1597499579
- Black Hat Python: https://nostarch.com/blackhatpython
Courses that can help you prepare for OSCP:
eLearnSecurity: eLearnSecurity offers affordable security training and a large amount of labs that you can practice in their hera lab network. They have their own certifications as well that you can take. These are the following courses that I took to help me prepare for OSCP.
- Penetration Testing Student (PTS): https://www.elearnsecurity.com/course/penetration_testing_student/
- Penetration Testing Professional (PTP): https://www.elearnsecurity.com/course/penetration_testing/
- Web Application Penetration Testing (WAPT): https://www.elearnsecurity.com/course/web_application_penetration_testing/
SANS: SANS provides a wide variety of information security courses. Each of their courses are taught by very smart instructors who have been in this field for a very long time. However, these courses can be expensive if you are unable to get someone to pay for them. You can also try to apply for the SANS workforce training as well to be able to take their courses at a discount. I have taken most of the SANS course and I feel that the following courses below really helped me get a better understanding of what Pentesting is like in the actual field. Here are the courses that I would recommend if you are looking to prepare for OSCP.
- SANS 560: https://www.sans.org/course/network-penetration-testing-ethical-hacking
- SANS 542: https://www.sans.org/course/web-app-penetration-testing-ethical-hacking
Pentesterlabs: A lot of web app pentesting material in this course: https://pentesterlab.com/
Pentester Academy: https://www.pentesteracademy.com/topics
Other OSCP guides:
- https://scund00r.com/all/oscp/2018/02/25/passing-oscp.html
- https://411hall.github.io/OSCP-Preparation
- https://www.gitbook.com/book/sushant747/total-oscp-guide
- http://0xc0ffee.io/blog/OSCP-Goldmine
- https://tulpa-security.com/2016/09/11/review-oscp-and-pwk/
- https://niiconsulting.com/checkmate/2017/06/a-detail-guide-on-oscp-preparation-from-newbie-to-oscp/
Other Links:
- https://practicalpentestlabs.com/
- https://immersivelabs.co.uk/
- http://pentestmonkey.net/cheat-sheet/shells/reverse-shell-cheat-sheet
- https://maikthulhu.github.io/2017-11-20-onenote-layout
Conclusion:
Welcome! You have arrived to the end of this journey (well not your OSCP journey if you decide to pursue it!). If you read this entire guide, I certainly give you props for doing so. If you read only parts of it, then I still give you props because the main thing that is important to me is that you learned something from it! I hope you are able to use my guide in your OSCP journey and are able to learn some new things, just like I did when I started mine. If this guide was able to help you let me know I want your feedback for sure. I thanked a lot of people for helping me with my journey in this guide and I want to thank them again for their time and contributions for helping me learn and grow in the cyber-security field. If anyone has any questions about this guide or feedback please let me know as you can reach out to me on twitter or on NetSecFocus!
-TJNull Twitter: https://twitter.com/TJ_Null
Github: https://github.com/tjnull
Netsec Focus: Tjnull
Hackthebox Discord AMA: https://www.youtube.com/watch?v=41DIav25Mp4
Bugcrowd: https://www.bugcrowd.com/researcher-spotlight-ambassador-tony-aka-tj-null/
P.S: Considering this journey as an extra mile, I am going to have to insist at this point for you to…… Try Harder! -Offensive Security